

How to setup and use a breakout room in Teams.
Breakout rooms are where people gather in small groups for lively conversation and brainstorming sessions. In the same way you can have students work in small groups to discuss a topic in a physical classroom, you can do the same on Teams using breakout rooms.
Breakout rooms are different from a channel. A channel can hold much, files, conversations and private meetings. A breakout room is just for a place to meet during a meeting.
Only meeting organizers using the desktop version of Teams can create and manage breakout rooms.
Create a breakout room
To create breakout rooms before a meeting and assign people to them:
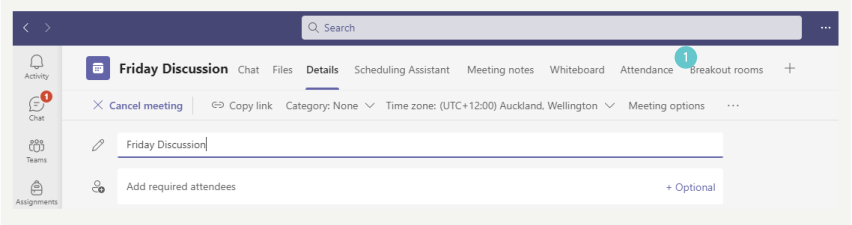
- Create your meeting, and go into the details for that meeting. Click Breakout rooms at the top of your meeting.
- Click Create rooms.
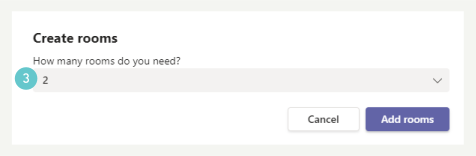
- Enter how many breakout rooms you need, then click Add rooms.
In this example there are three rooms to which no-one has yet been assigned:
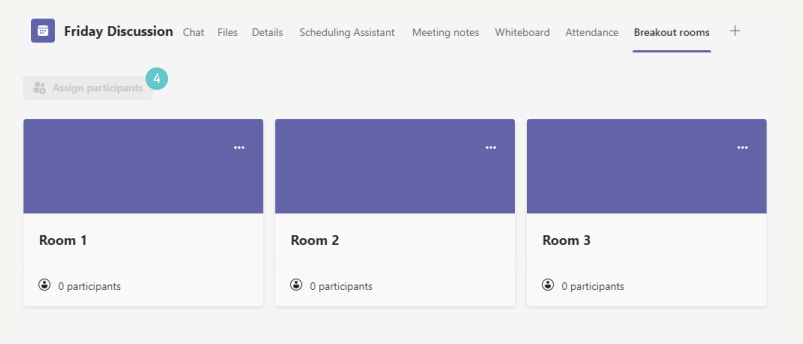
- Click Assign participants. There are two options:
- Automatically – Teams will assign people randomly for you.
- Manually – You can decide yourself who to put into which breakout room.
In this example we’ll assign manually.
Click Manually.
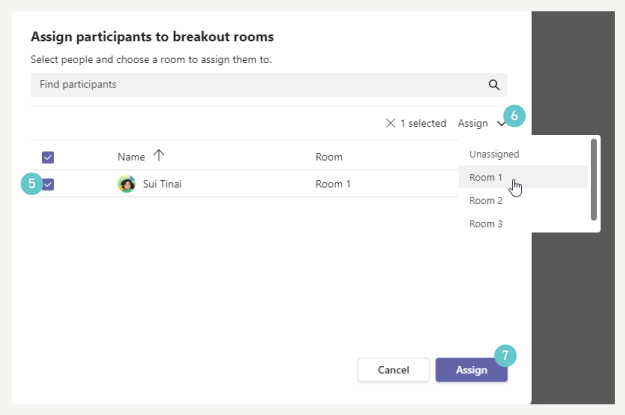
- Tick the person/multiple people you want to assign to a room.
- Click the Assign menu and pick a room. Those/that person will be assigned to one of your rooms.
- Click Assign to confirm your assignments.
Create a Breakout room during a meeting
You can also create a breakout room during the meeting. This is great if you hadn’t planned to breakout, but you need to because of the direction in which the meeting is going.
Select the Breakout rooms icon from the menu in Teams during the meeting itself.

This will open the Breakout rooms pane. If you have already prepared breakout rooms before the meeting you can edit those settings here, or, if you haven’t crated breakout rooms in advance, you can create them now.
- Choose the number of rooms.
- Choose whether to assign automatically or manually.
- Click Create rooms.
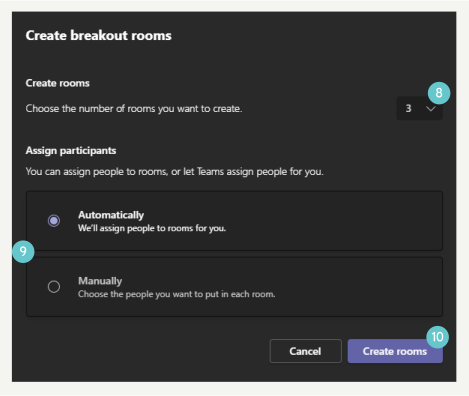
- Assign people as shown above to your rooms, then click Assign.
You can only assign people who are currently in the meeting from here. If some of your class haven’t joined the call yet, you will not be able to assign them during the call until they arrive in the meeting.
If someone arrives late to a meeting who you didn’t assign in advance, you can easily assign them during the callusing this breakout pane.
Breakout room management
Breakout rooms can have different settings from the main meeting.
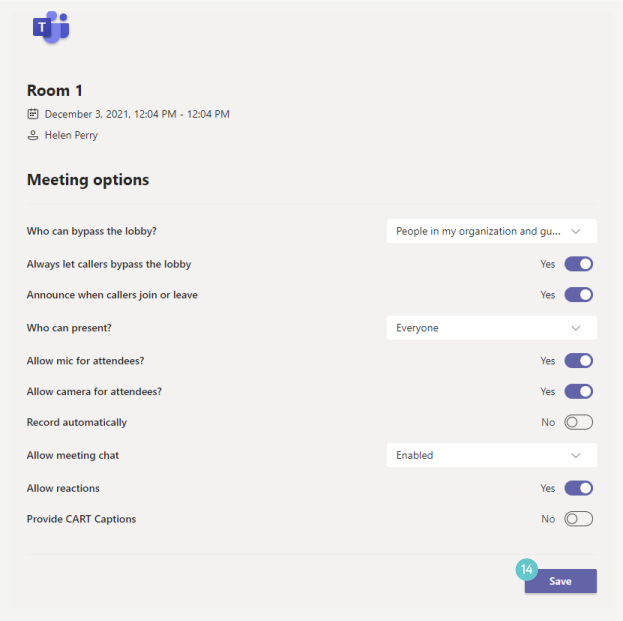
- Click on the Settings for one of the breakout rooms using the three dots on a room tile. Click Settings.

You can change various settings, e.g. you can enable/disable chat or allow/disallow reactions etc.
- Alter room settings as you need.
- Click Save.
- Repeat for other rooms as necessary
During the meeting you can also allow others to manage a room. Breakout room Managers can:
- Add and delete rooms.
- Assign and reassign participants to rooms.
- Open and close rooms.
- Join any rooms.
- Set time limits for room sessions.
- Send announcements.
- Recreate rooms
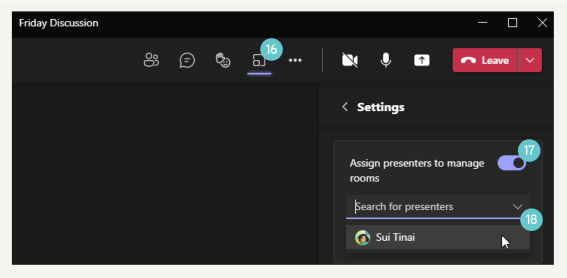
- During the meeting, go to the Breakout pane and click the Settings icon.
- Toggle Assign presenter to manage rooms to On.
- Select presenters.
Timer for a breakout room
You can set a timer on a breakout room so that it will close after a certain amount of time.
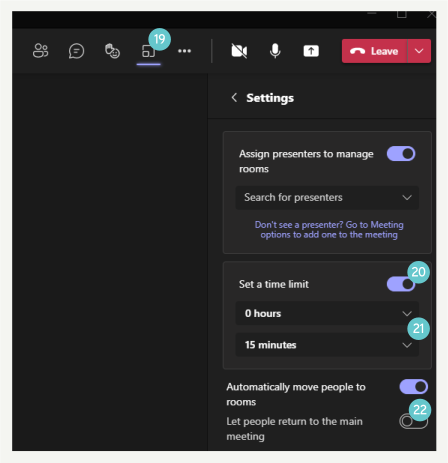
- During the meeting, go to the Breakout pane and click the Settings icon.
- Toggle Set a time limit to On.
- Set a time limit for the rooms.
You can also allow people to return to the main meeting by their own choice.
- Toggle Let people return to the main meeting to On.
Start the Breakout rooms
During the meeting you will need to start the breakout rooms at the appropriate time:
- During the meeting, go to the Breakout pane and click the Open button
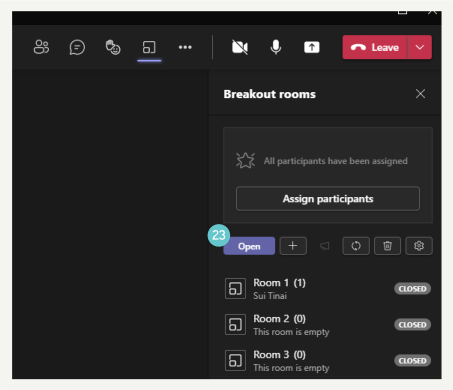
Once the breakout rooms are open, they/it will be labelled as open. You can close them early by clicking on the close button (where the Open button used to be).
Communicating with breakout rooms
As meeting organizer, you can join or leave any breakout rom you wish, whenever you wish. This is like keeping an eye/ear on your class when they are working in groups.
You can also send an announcement to every room, e.g. five minutes left.
- Click on the Breakout rooms pane.
- Click on the Announcement icon
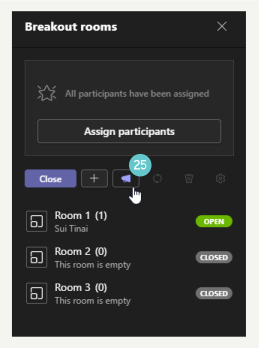
- Enter your announcement.
- Click Send.

Hints and Tips
- You can’t create breakout rooms if there are more than 300 people in a meeting.
- People can leave the meeting from a breakout room just as they can leave a meeting from the ‘normal’ screen.
- Prepare your breakout rooms in advance if where possible.
- Decide if you want to assign people yourself or have Teams do it. This depends on the reason for the breakout room.
- Communicate during the meeting that you’re going to be using breakout rooms, and let people know when you’re opening them, just so they don’t panic.